Adding Custom Map Nodes
In Tutorial 9 we customised how Headlamp looks. In this tutorial we will extend what Headlamp shows — specifically, we will add the MyPod resources from our plugin to Headlamp's Map view.
Table of Contents
- Introduction to the Map View
- Concepts: Nodes, Edges, and Sources
- Creating a Map Source for MyPod
- Registering the Source
- Adding a Custom Node Icon
- Adding Edges Between Nodes
- What's Next
- Quick Reference
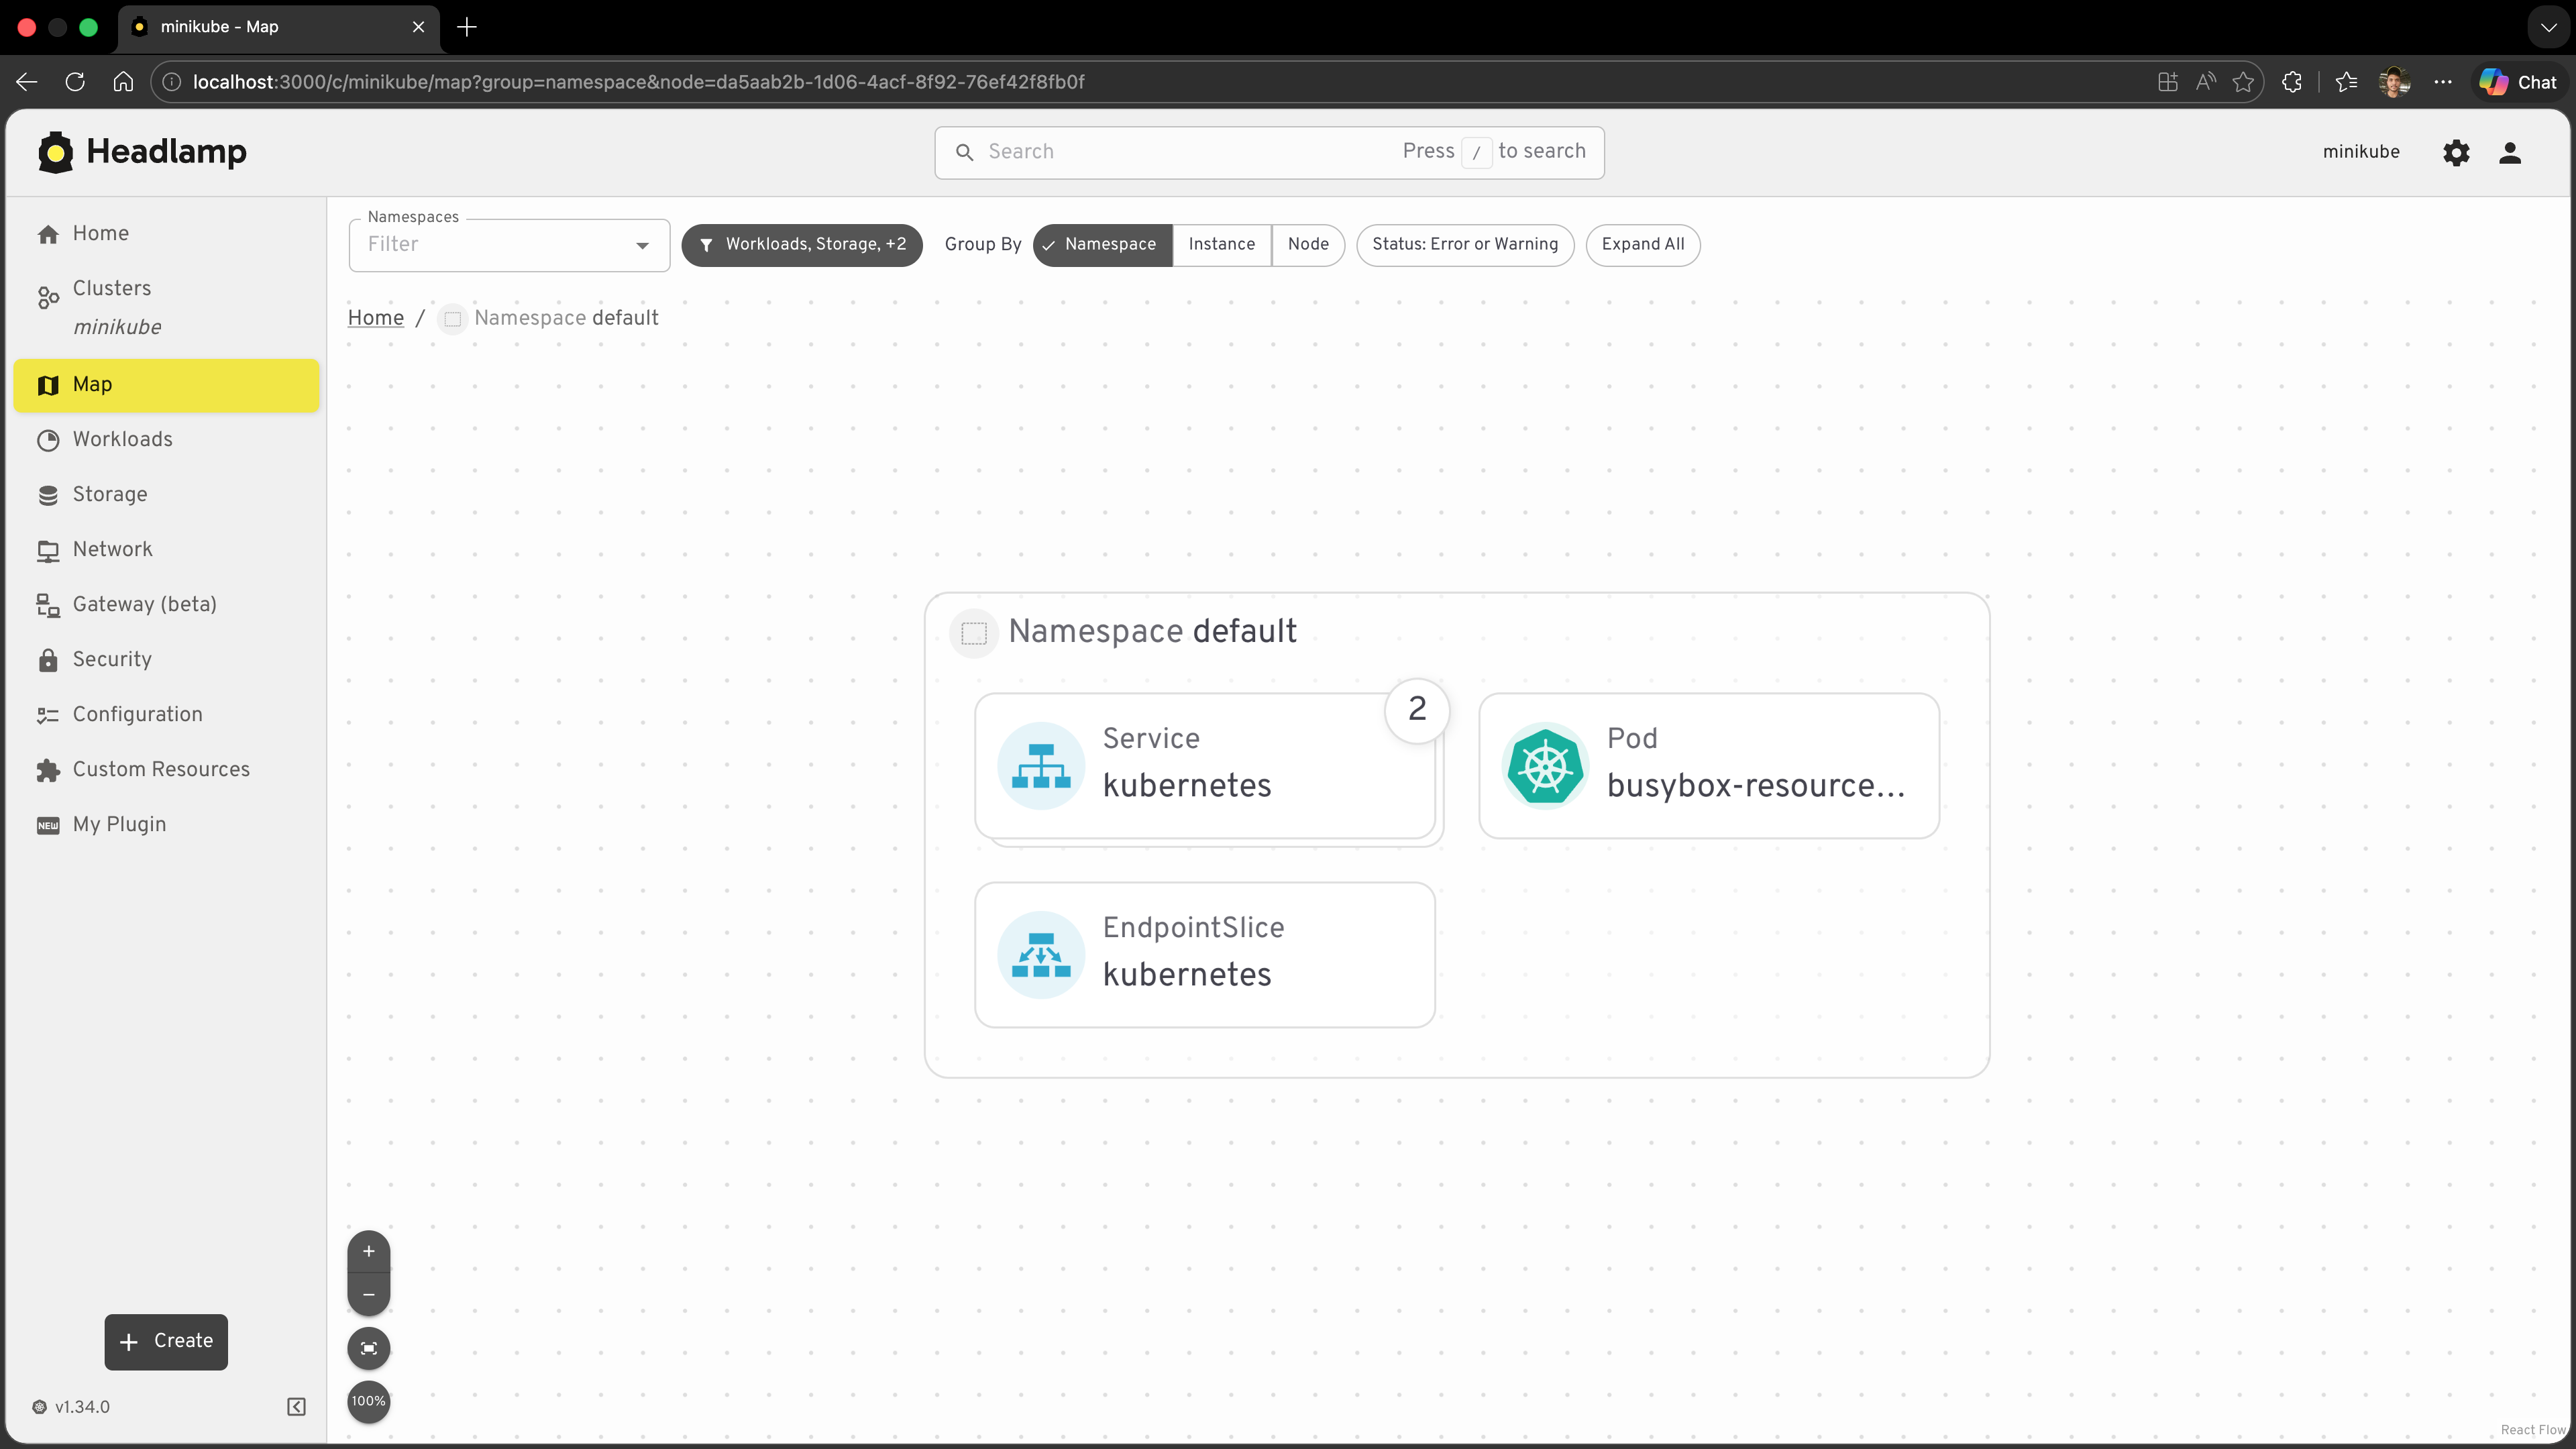
Introduction to the Map View
Headlamp's Map view (accessible via the Map button in the sidebar when a cluster is connected) renders your cluster as an interactive graph. Every built-in resource — Deployments, ReplicaSets, Pods, Services, and more — is displayed as a node, and the ownership relationships between them are shown as edges.
The map is not limited to built-in resources. Plugins can register their own sources — collections of nodes and edges that teach the map about resources that Headlamp does not know about by default. This is especially useful for:
- Custom Resource Definitions (CRDs) — controllers like KEDA, Argo CD, or Flux introduce CRDs that the built-in map has no knowledge of. A plugin can add those resources as first-class nodes.
- Plugin-managed resources — if your plugin works with a specific subset of standard resources (like our
MyPodclass), you can surface them as a dedicated, filterable source.
In this tutorial we will register our MyPod resource class as a map source so that all pods appear in the map under a "My Pods" entry in the source picker.
Concepts: Nodes, Edges, and Sources
Before writing code it helps to understand the three building blocks:
| Concept | What it represents | Example |
|---|---|---|
| Node | A single resource displayed on the map | One pod, one deployment |
| Edge | A directed relationship between two nodes | ReplicaSet → Pod (ownership) |
| Source | A named collection of nodes and edges | "My Pods", "KEDA ScaledObjects" |
A source is a GraphSource object with three required properties:
// A leaf source — fetches its own nodes/edges
{
  id: string;        // Unique across all sources
  label: string;     // Shown in the source picker UI
  icon?: ReactNode;  // Optional icon in the source picker
  useData(): { nodes?: GraphNode[]; edges?: GraphEdge[] } | null;
}

// A parent source — groups child sources (cannot have useData)
{
  id: string;
  label: string;
  icon?: ReactNode;
  sources: GraphSource[];
}
The useData() function is a React hook — you can call other hooks inside it (like MyPod.useList()). It must return null while data is loading, or an object with nodes (and optionally edges) once data is ready. Because useData() is called on every render, wrap your return value in useMemo so the map only re-renders when the data actually changes.
Creating a Map Source for MyPod
We will add the map source directly to src/index.tsx, alongside the existing registrations.
Step 1: Update src/index.tsx
Add the registerMapSource import and define the source at the bottom of the file, after your existing registrations:
import { registerMapSource } from '@kinvolk/headlamp-plugin/lib';
import { useMemo } from 'react';
import { MyPod } from './resources/pod';

// ... your existing registerRoute / registerSidebarEntry calls ...

const myPodSource = {
  id: 'hello-headlamp-pods',
  label: 'My Pods',
  useData() {
    const [pods] = MyPod.useList();

    return useMemo(() => {
      // Return null while loading — the map will show a spinner
      if (!pods) return null;

      const nodes = pods.map(pod => ({
        id: pod.metadata.uid,   // Must be unique; uid is a safe choice
        kubeObject: pod,        // Tells the map this node is a Kubernetes resource
      }));

      return { nodes };
    }, [pods]);
  },
};

registerMapSource(myPodSource);
Key points:
| Property | Purpose |
|---|---|
id | Unique identifier for the source; namespace it with your plugin name |
label | Text shown in the source picker |
useData() | Hook called by the map to fetch nodes and edges |
node.id | Must be unique across all nodes in the map; metadata.uid is a reliable choice |
node.kubeObject | Attach the KubeObject instance so the map can show default Kubernetes details |
Step 2: Open the Map view
- Save the file and let the plugin rebuild.
- Open Headlamp and connect to your cluster.
- Click Map in the sidebar.
- In the source picker (the panel on the left), find "My Pods" and make sure it is enabled.
You should see all pods from your cluster appear as nodes on the map under the My Pods source.
Registering the Source
registerMapSource accepts the source object and registers it globally. You can call it at module load time (outside any component or hook):
import { registerMapSource } from '@kinvolk/headlamp-plugin/lib';

registerMapSource(myPodSource);
That is all — there is no teardown or cleanup required. The source stays registered for the lifetime of the plugin.
Grouping Sources
If your plugin registers multiple sources (for example, you later add a MyService source), you can group them under a single parent:
const myPluginSource = {
  id: 'hello-headlamp',
  label: 'Hello Headlamp',
  sources: [myPodSource, myServiceSource],  // Nested sources
};

registerMapSource(myPluginSource);
The parent source becomes a collapsible group in the source picker. This is the pattern used by the KEDA plugin, which groups ScaledObjects, ScaledJobs, TriggerAuthentications, and ClusterTriggerAuthentications under a single "KEDA" entry.
Adding a Custom Node Icon
By default, nodes that have a kubeObject show a generic icon based on the resource kind. You can register a custom icon for any kind using registerKindIcon:
import { registerMapSource, registerKindIcon } from '@kinvolk/headlamp-plugin/lib';

// Register a custom icon for the "Pod" kind
registerKindIcon('Pod', {
  icon: (
    <img
      src="https://kubernetes.io/icons/favicon-64.png"
      alt="Pod"
      style={{ width: '100%', height: '100%' }}
    />
  ),
});
registerKindIcon applies to all nodes of that kind in the entire map, not just the ones in your source. If you only want a custom icon for your source's nodes, provide it via the source's icon property instead (which only affects the source picker entry, not individual nodes).
You can also use Iconify icons (already bundled with Headlamp via @iconify/react):
import { Icon } from '@iconify/react';

registerKindIcon('Pod', {
  icon: <Icon icon="mdi:kubernetes" width="100%" height="100%" />,
});
The map also supports providing a detailsComponent on individual nodes to customise the side panel that appears when a node is selected. However, avoid doing this for resource kinds that Headlamp already handles natively (like Pod, Deployment, etc.) — overriding their default detail views can confuse users who expect the standard Headlamp experience. detailsComponent is most valuable for CRDs and custom resources that Headlamp has no built-in detail view for.
Adding Edges Between Nodes
Edges draw connections between nodes. Each edge needs a source node id and a target node id:
const edge = {
  id: `${fromNode.id}-${toNode.id}`, // Must be unique
  source: fromNode.id,
  target: toNode.id,
};
For our MyPod example there is no obvious second resource to connect to (our plugin only manages pods). But edges become important when your plugin handles related resources — for instance, if you also had a MyDeployment source, you could draw edges from each deployment to the pods it owns.
The KEDA plugin is a good real-world reference for edges: it connects each ScaledObject to the HorizontalPodAutoscaler that KEDA creates for it, and draws edges from ScaledObjects/ScaledJobs to the TriggerAuthentication resources they reference.
Here is the pattern to produce edges alongside nodes (inside src/index.tsx):
useData() {
  const [pods] = MyPod.useList();
  // Imagine we also had a MyNode resource
  // const [nodes] = MyNode.useList();

  return useMemo(() => {
    if (!pods) return null;

    const nodes = pods.map(pod => ({
      id: pod.metadata.uid,
      kubeObject: pod,
    }));

    const edges = [];
    // Example: connect each pod to a related resource
    // pods.forEach(pod => {
    //   const relatedNode = kubeNodes?.find(n => n.metadata.name === pod.jsonData.spec.nodeName);
    //   if (relatedNode) {
    //     edges.push({
    //       id: `${pod.metadata.uid}-${relatedNode.metadata.uid}`,
    //       source: pod.metadata.uid,
    //       target: relatedNode.metadata.uid,
    //     });
    //   }
    // });

    return { nodes, edges };
  }, [pods]);
},
What's Next
You've extended Headlamp's Map view with your own resources:
- ✅ Understood how the map is built from nodes, edges, and sources
- ✅ Created a
GraphSourceobject forMyPodusing theuseData()hook - ✅ Registered it with
registerMapSource - ✅ Added a custom node icon with
registerKindIcon - ✅ Learned how to group sources and add edges
Next: Tutorial 11 – Releasing & Publishing
- Packaging your plugin for distribution
- Publishing to Artifact Hub
- Versioning and changelogs
Quick Reference
Minimal Source
import { registerMapSource } from '@kinvolk/headlamp-plugin/lib';
import { useMemo } from 'react';

registerMapSource({
  id: 'my-source',
  label: 'My Source',
  useData() {
    const [items] = MyResource.useList();
    return useMemo(() => {
      if (!items) return null;
      return {
        nodes: items.map(item => ({
          id: item.metadata.uid,
          kubeObject: item,
        })),
      };
    }, [items]);
  },
});
Source with Icon
import { Icon } from '@iconify/react';

registerMapSource({
  id: 'my-source',
  label: 'My Source',
  icon: <Icon icon="mdi:kubernetes" width="100%" height="100%" />,
  useData() { /* ... */ },
});
Custom Kind Icon
import { registerKindIcon } from '@kinvolk/headlamp-plugin/lib';

registerKindIcon('MyResourceKind', {
  icon: <img src="/path/to/icon.png" style={{ width: '100%', height: '100%' }} />,
});
Edge Between Two Nodes
const edge = {
  id: `${sourceNode.id}-${targetNode.id}`,
  source: sourceNode.id,
  target: targetNode.id,
};
Grouped Sources
registerMapSource({
  id: 'my-plugin',
  label: 'My Plugin',
  sources: [sourceA, sourceB, sourceC],
});
Useful Links
- Extending the Map — Headlamp Docs
- registerMapSource API Reference
- registerKindIcon API Reference
- registerKubeObjectGlance API Reference
- KEDA plugin mapView.tsx — real-world example with multiple sources and edges