Creating Your First Headlamp Plugin
This tutorial guides you through creating your first Headlamp plugin from scratch. By the end, you'll have a working plugin that appears in Headlamp's UI and you'll understand how hot reloading makes plugin development fast and enjoyable.
Table of Contents
- Introduction
- Understanding the Plugin System
- Create Your First Plugin
- Explore the Plugin Structure
- Run the Plugin in Development Mode
- See Your Plugin in Headlamp
- Hot Reloading in Action
- Understanding What Happened
- Troubleshooting
- What's Next
- Quick Reference
Introduction
In Tutorial 1, you set up Headlamp to run locally from source. Now it's time to extend it!
Plugins let you add new features to Headlamp without modifying its core code. You can:
- Add buttons, menus, and panels to the UI
- Create entirely new pages
- Customize how Kubernetes resources are displayed
- Change themes and branding
- And much more!
What You'll Build
In this tutorial, you'll create a simple plugin called hello-headlamp that:
- Displays "Hello" in Headlamp's top navigation bar
- Appears in the Settings → Plugins list
This gives you the foundation for all future plugin development.
Prerequisites
Before starting, ensure you have:
- ✅ Completed Tutorial 1: Running Headlamp from Source
- ✅ Headlamp running locally (or ready to start)
- ✅ Node.js ≥20.11.1 and npm ≥10.0.0
Verify your setup:
node --version    # Should be v20.11.1 or higher
npm --version     # Should be 10.0.0 or higher
Time to complete: ~15 minutes
Understanding the Plugin System
Before we dive into code, let's understand how plugins work at a high level.
How Plugins Work
┌─────────────────────────────────────────────────────────┐
│                      Headlamp                           │
│  ┌─────────────────────────────────────────────────┐    │
│  │                  Plugin Registry                │    │
│  │  ┌─────────┐  ┌─────────┐  ┌─────────┐          │    │
│  │  │ Plugin A│  │ Plugin B│  │ Plugin C│   ...    │    │
│  │  └─────────┘  └─────────┘  └─────────┘          │    │
│  └─────────────────────────────────────────────────┘    │
│                         ↓                               │
│  ┌─────────────────────────────────────────────────┐    │
│  │               Headlamp UI                       │    │
│  │   (App Bar, Sidebar, Pages, Details Views...)   │    │
│  └─────────────────────────────────────────────────┘    │
└─────────────────────────────────────────────────────────┘
- Plugins are JavaScript/TypeScript modules — They export code that Headlamp loads at startup
- Plugins register themselves — Using functions like
registerAppBarAction()to tell Headlamp where to display their components - Headlamp discovers plugins automatically — During development, plugins make themselves available to Headlamp
Plugin Locations
Headlamp looks for plugins in specific directories depending on how you're running it:
| Mode | Plugin Location |
|---|---|
| Development | ~/.config/Headlamp/plugins/ (Linux/macOS) or %APPDATA%\Headlamp\Config\plugins\ (Windows) — plugins running npm start automatically copy here |
| Desktop App | ~/.config/Headlamp/plugins/ (Linux/macOS) or %APPDATA%\Headlamp\Config\plugins\ (Windows) |
| In-Cluster | Configured via Headlamp deployment |
For this tutorial, we'll use development mode, the easiest way to build and test plugins.
Create Your First Plugin
Let's create your first plugin! We'll use the headlamp-plugin tool which scaffolds a ready-to-use plugin project.
Step 1: Choose a Location
Create your plugin outside the Headlamp repository. This keeps your plugin code separate and organized.
# Go to your projects directory (create one if needed)
mkdir -p ~/projects
cd ~/projects
Why outside the Headlamp repo? Plugins are independent projects with their own dependencies. Keeping them separate makes them easier to manage, version, and share.
Step 2: Create the Plugin
Run the following command to scaffold a new plugin:
npx --yes @kinvolk/headlamp-plugin create hello-headlamp
You'll see output like this:
Creating plugin: hello-headlamp...
...
Run `npm audit` for details.
"hello-headlamp" created.
1) Run the Headlamp app (so the plugin can be used).
2) Open hello-headlamp/src/index.tsx in your editor.
3) Start development server of the plugin watching for plugin changes.
  cd "hello-headlamp"
  npm run start
4) See the plugin inside Headlamp.
What just happened?
npxdownloaded and ran the@kinvolk/headlamp-plugintool- The
createcommand generated a new plugin folder calledhello-headlamp - Dependencies were automatically installed (you saw
npm ciin the output) - The folder contains all the files you need to start developing
Explore the Plugin Structure
Let's look at what was created:
hello-headlamp/
├── src/
│   └── index.tsx         # 👈 Main entry point - your plugin code goes here
├── package.json          # 👈 Plugin metadata and npm scripts
├── tsconfig.json         # TypeScript configuration
└── README.md             # Plugin documentation
The Entry Point: src/index.tsx
Open src/index.tsx in your editor. You'll see:
import { registerAppBarAction } from '@kinvolk/headlamp-plugin/lib';

// Below are some imports you may want to use.
//   See README.md for links to plugin development documentation.
// import { Headlamp, K8s, useTranslation } from '@kinvolk/headlamp-plugin/lib';
// import { SectionBox } from '@kinvolk/headlamp-plugin/lib/CommonComponents';
// import { K8s } from '@kinvolk/headlamp-plugin/lib/K8s';
// import { Typography } from '@mui/material';

registerAppBarAction(<span>Hello</span>);
Let's break this down:
| Line | What it does |
|---|---|
import { registerAppBarAction } | Imports a function from the Headlamp plugin SDK |
registerAppBarAction(<span>Hello</span>) | Registers a React component to display in the app bar |
That's it! Just two lines of meaningful code, and you have a working plugin.
The Metadata: package.json
Open package.json to see your plugin's configuration:
{
  "name": "hello-headlamp",
  "version": "0.1.0",
  "description": "Your Headlamp plugin",
  "scripts": {
    "start": "headlamp-plugin start",
    "build": "headlamp-plugin build",
    "format": "headlamp-plugin format",
    "lint": "headlamp-plugin lint",
    "lint-fix": "headlamp-plugin lint --fix",
    "tsc": "headlamp-plugin tsc",
    "test": "headlamp-plugin test",
    "package": "headlamp-plugin package"
  },
  ...
}
Key scripts you'll use:
| Script | Purpose |
|---|---|
npm start | Run plugin in development mode with hot reloading |
npm run build | Build plugin for production |
npm run lint | Check code for issues |
npm run format | Auto-format your code |
Run the Plugin in Development Mode
Now let's see your plugin in action! You'll need two terminal windows.
Terminal 1: Start Headlamp
Navigate to your Headlamp repository and start it:
cd ~/git/headlamp  # or wherever you cloned Headlamp
npm start
Wait until you see both backend and frontend are running:
- Frontend: http://localhost:3000
- Backend: http://localhost:4466
Terminal 2: Start Your Plugin
In a new terminal, navigate to your plugin and start it:
cd ~/projects/hello-headlamp
npm start
You'll see output like:
Watching for changes...
Plugin is available for Headlamp
What's happening?
- The plugin is being compiled from TypeScript to JavaScript
- It's watching for file changes (for hot reloading)
- It's announcing itself to Headlamp running on localhost
Keep both terminals running! Headlamp needs to be running for your plugin to appear. The plugin's
npm startwatches for changes and automatically rebuilds.
See Your Plugin in Headlamp
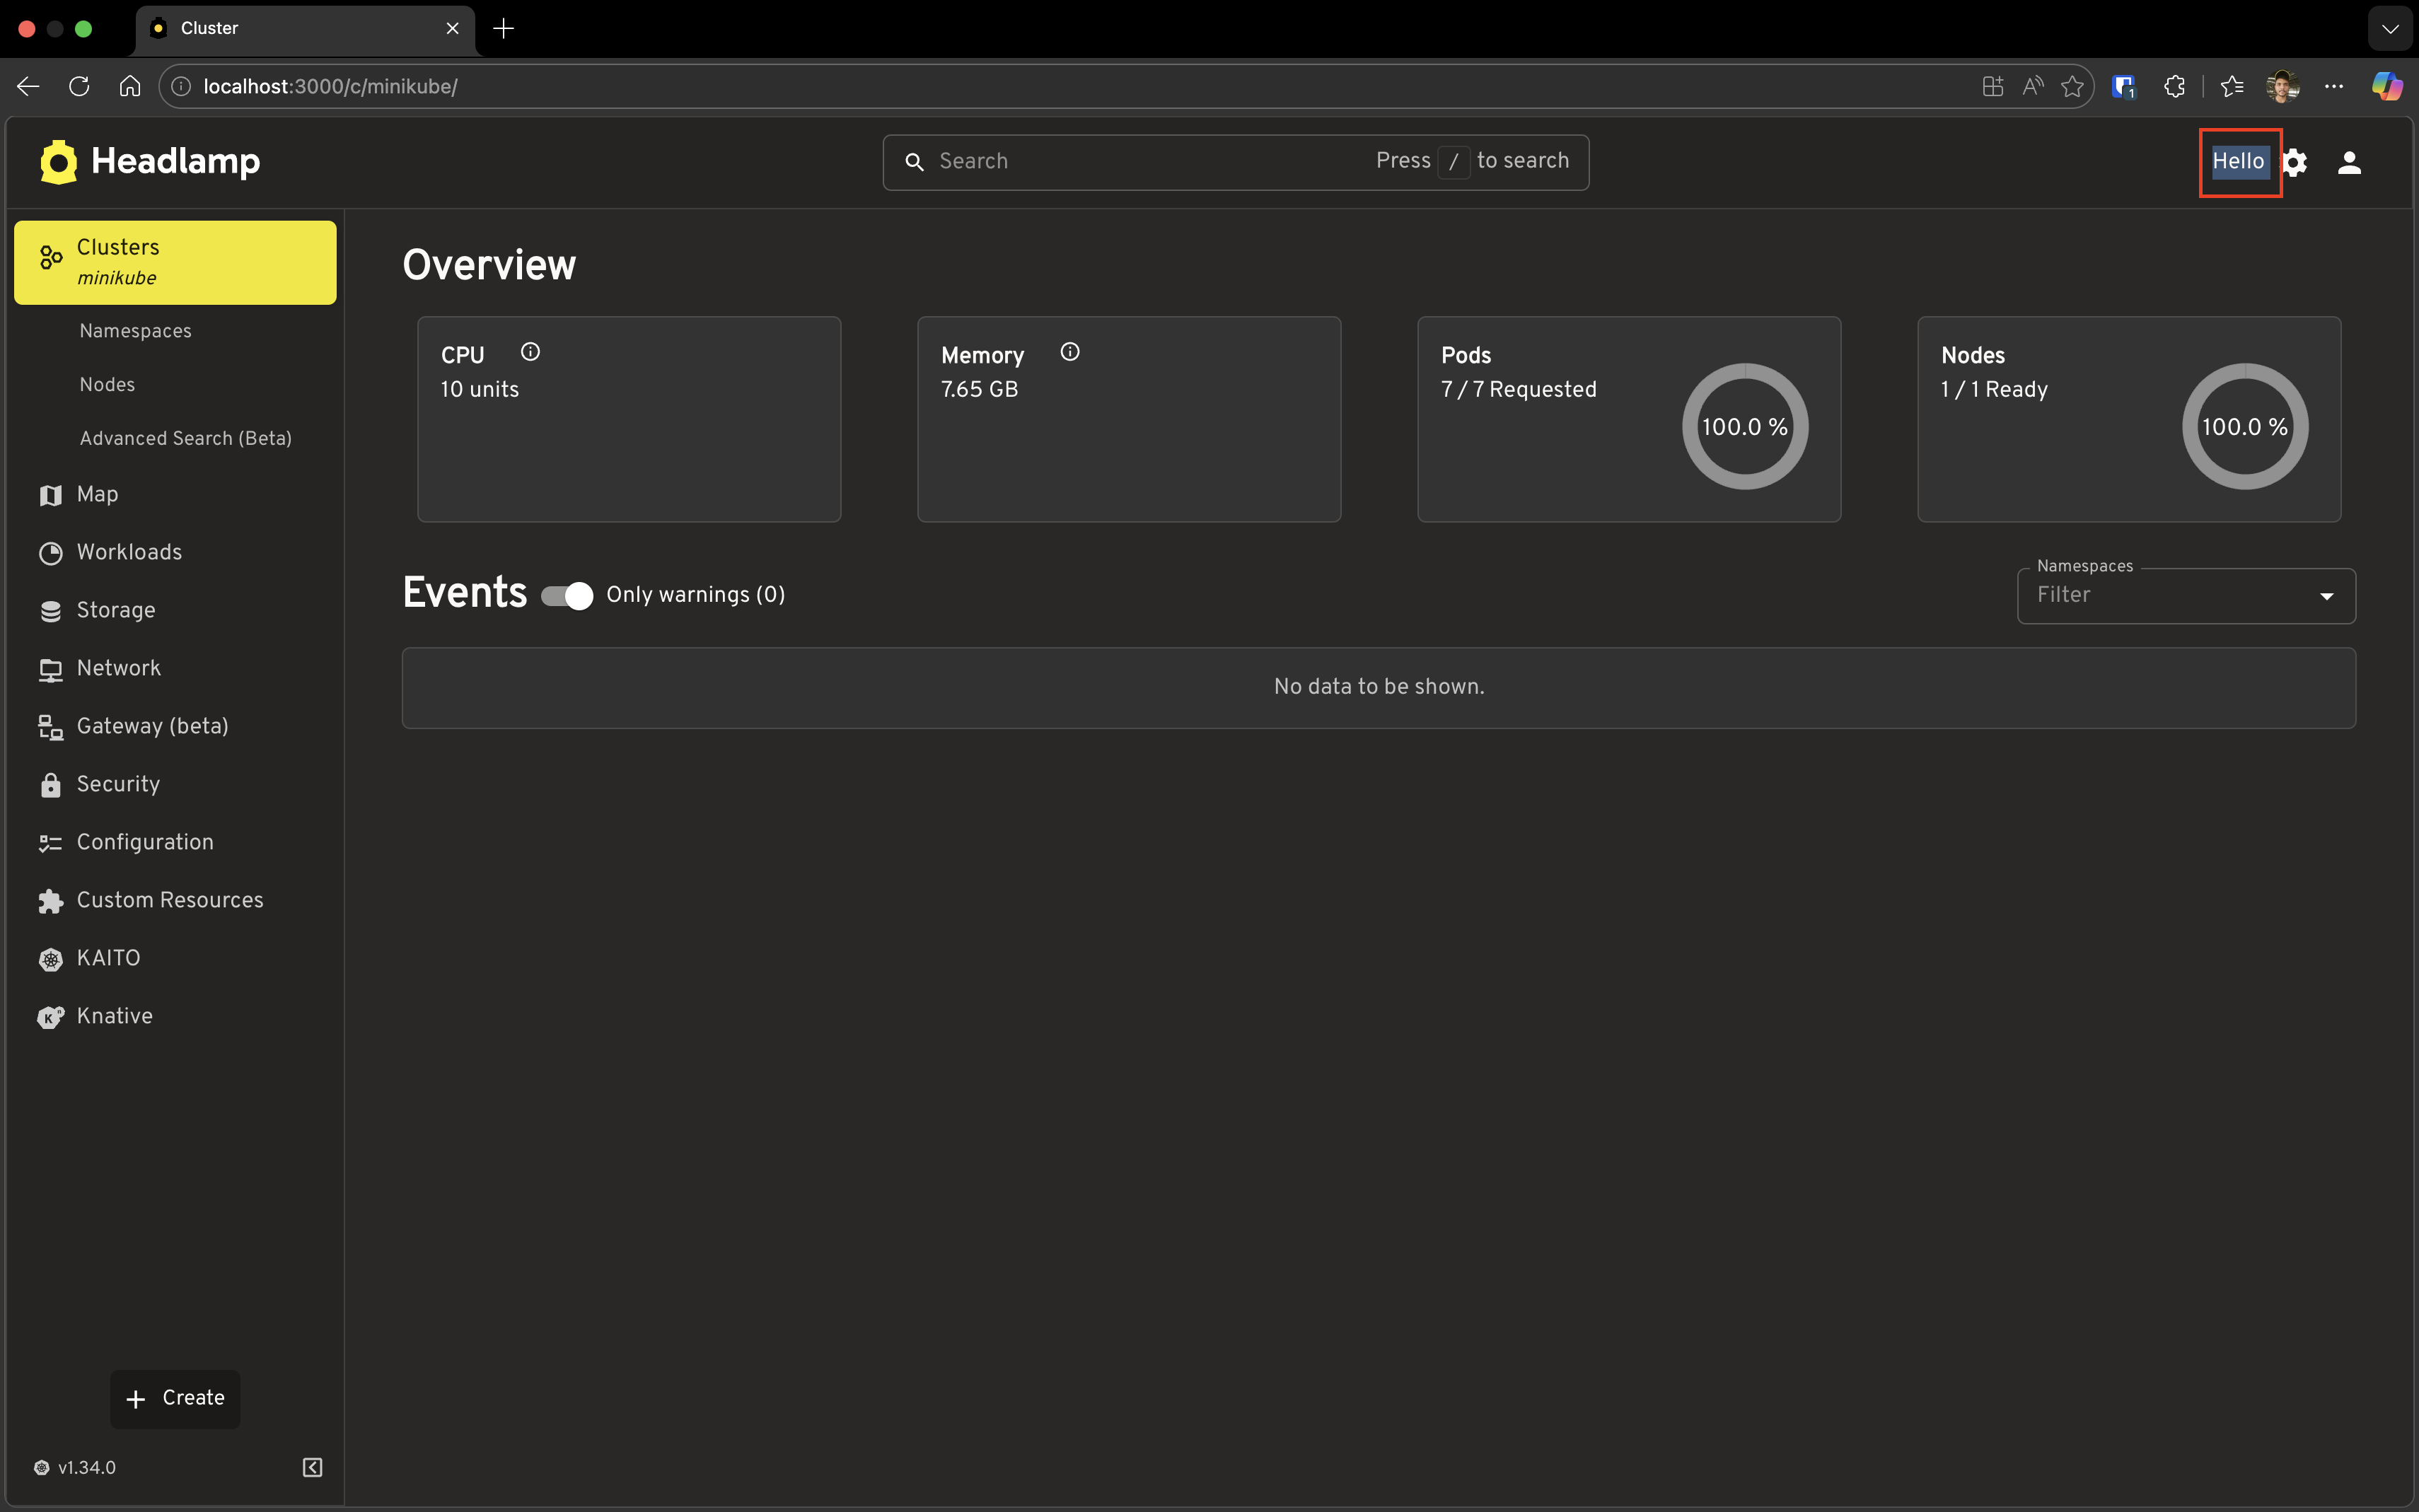
Open your browser and go to http://localhost:3000.
Step 1: Look for "Hello" in the App Bar
Look at the top-right area of the screen (the app bar). You should see "Hello" appearing among the icons!
Step 2: View Your Plugin in Settings
- Click the Settings icon (⚙️) in the app bar
- Click on Plugins in the settings menu
You'll see a list of all loaded plugins, including your hello-headlamp plugin!
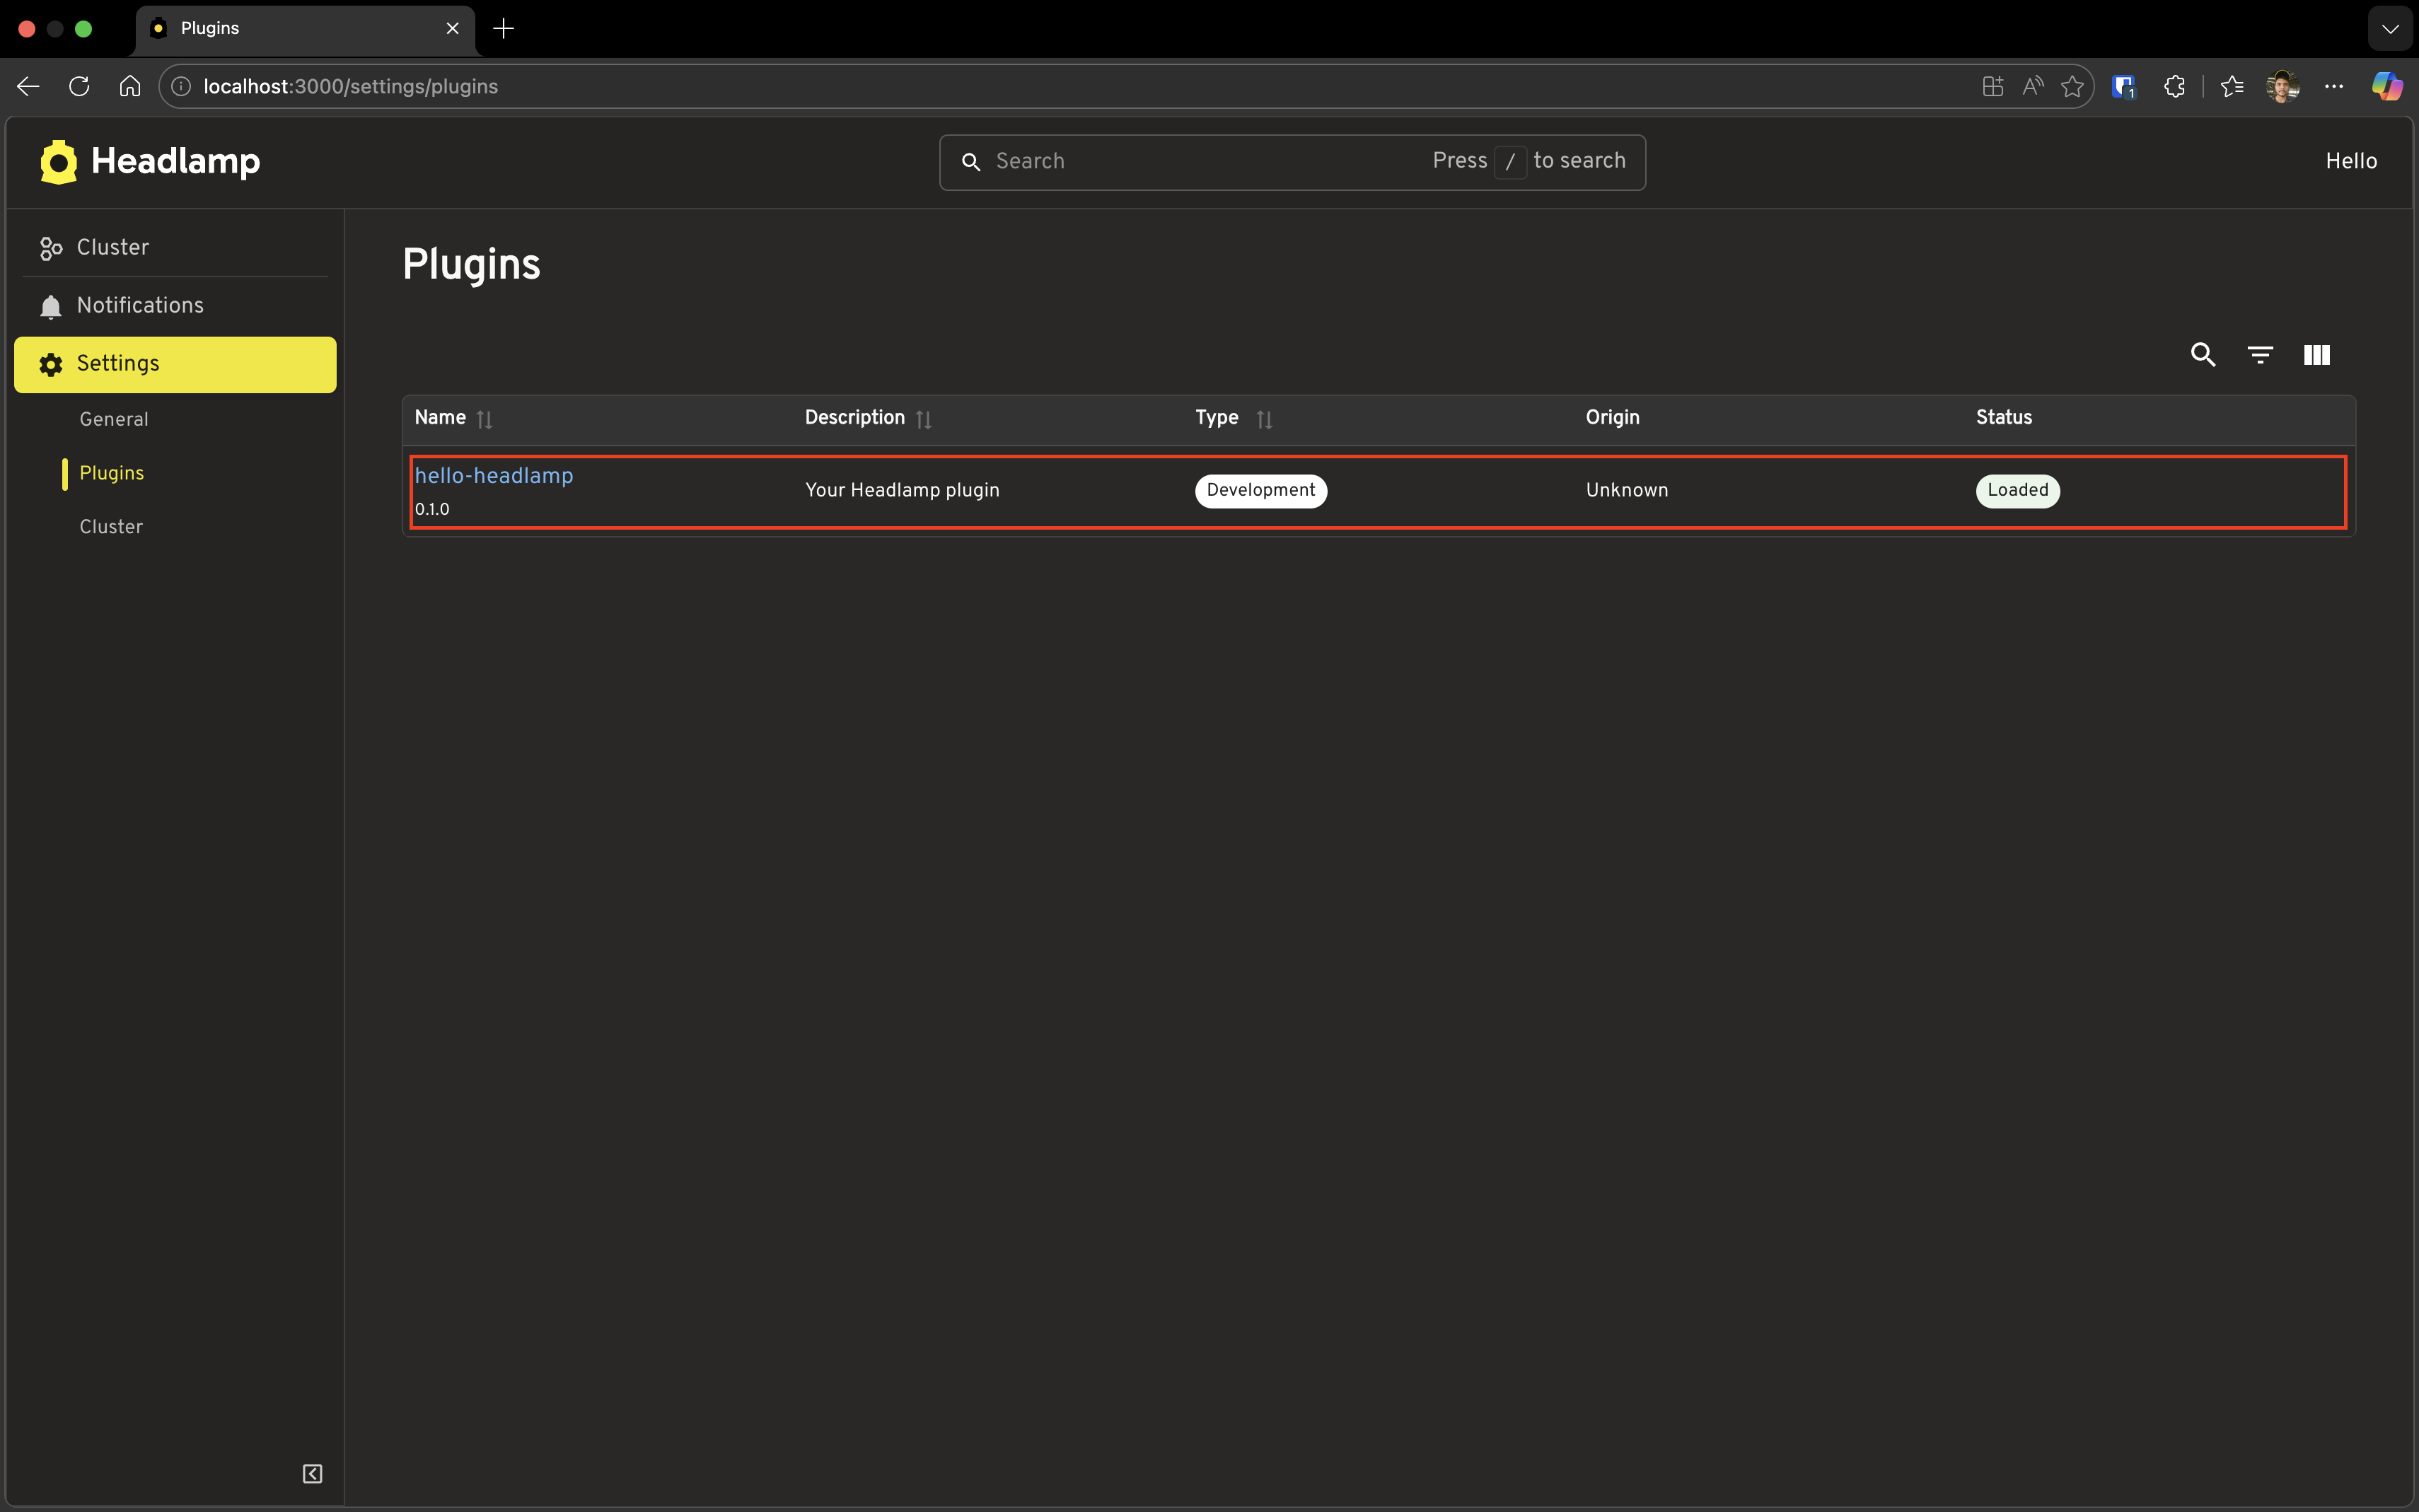
The plugin entry shows:
- Name: hello-headlamp
- Version: 0.1.0 (shown below the name)
- Description: Your Headlamp plugin (from package.json)
- Type: Development (indicates this is a development plugin)
- Enable/Disable toggle (Desktop App only): You can turn plugins on or off in the desktop app
🎉 Congratulations! Your plugin is running in Headlamp!
Hot Reloading in Action
One of the best features of plugin development is hot reloading—changes you make appear instantly without restarting anything.
Make a Change
Open src/index.tsx in your editor and change:
registerAppBarAction(<span>Hello</span>);
To:
registerAppBarAction(<span>🚀 Hello Headlamp!</span>);
Save and Watch
- Save the file
- Look at your plugin terminal—you'll see it rebuilding
- Look at your browser—the app bar updates automatically!
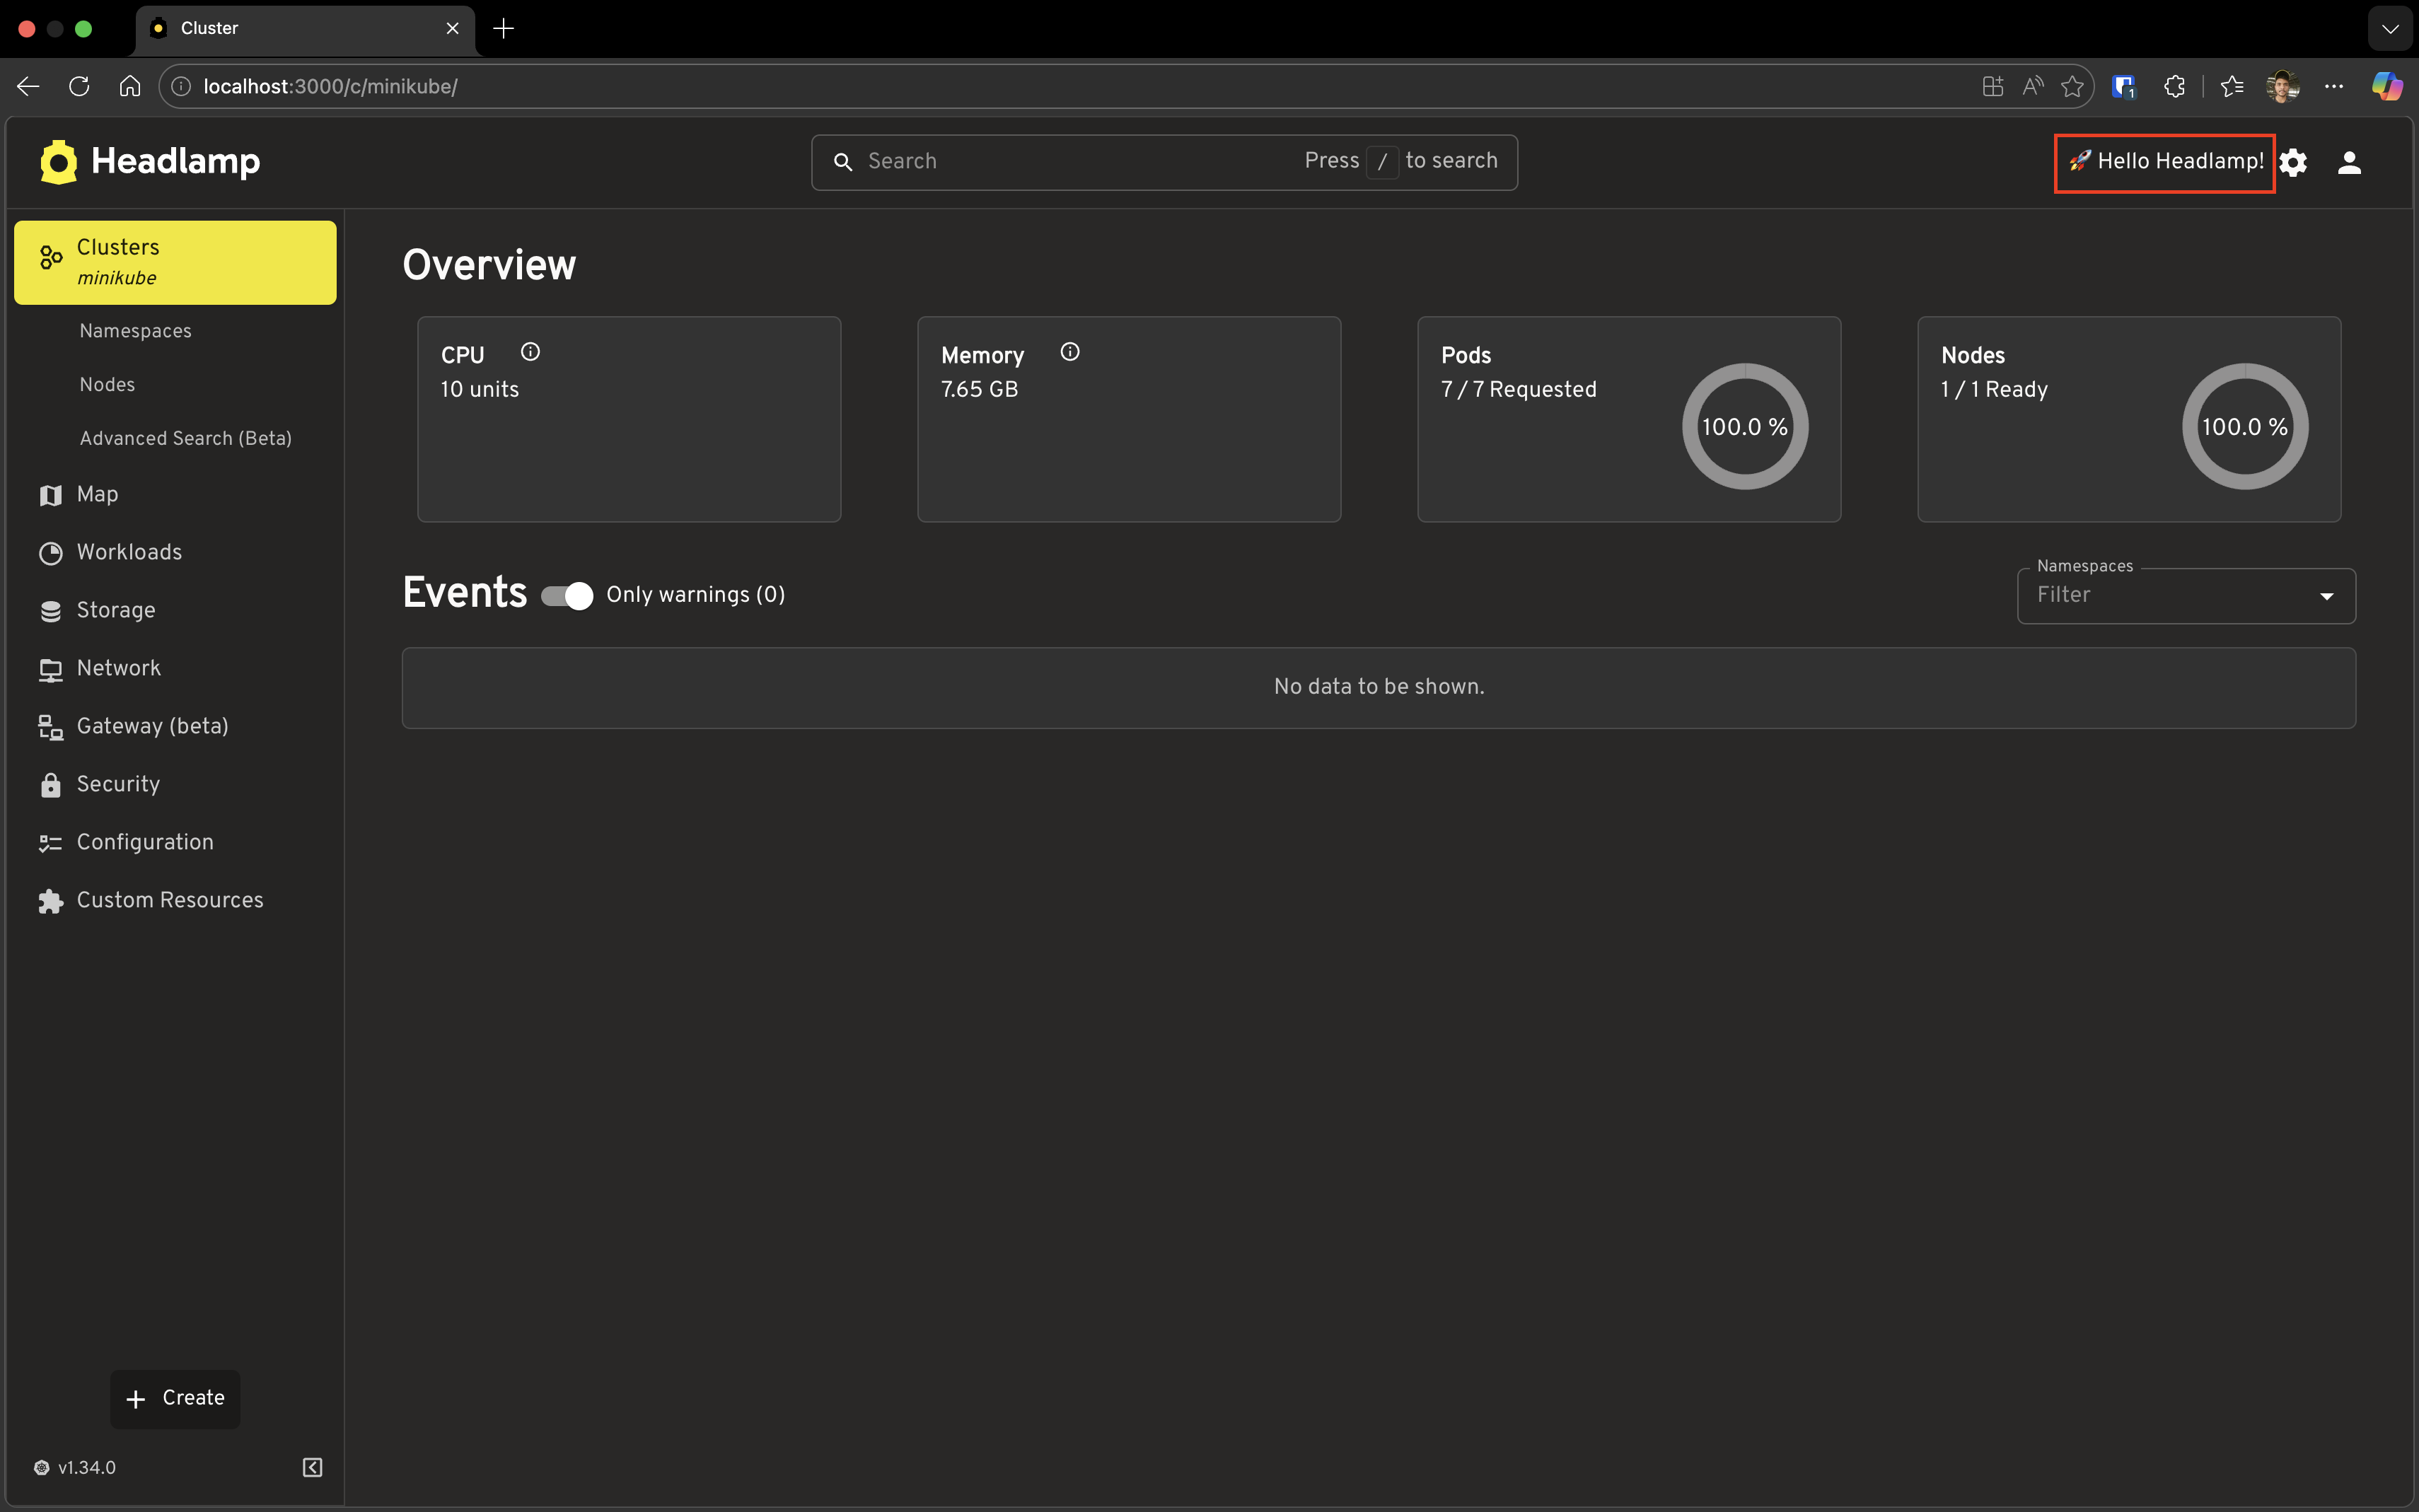
No manual refresh needed! This makes development fast and enjoyable.
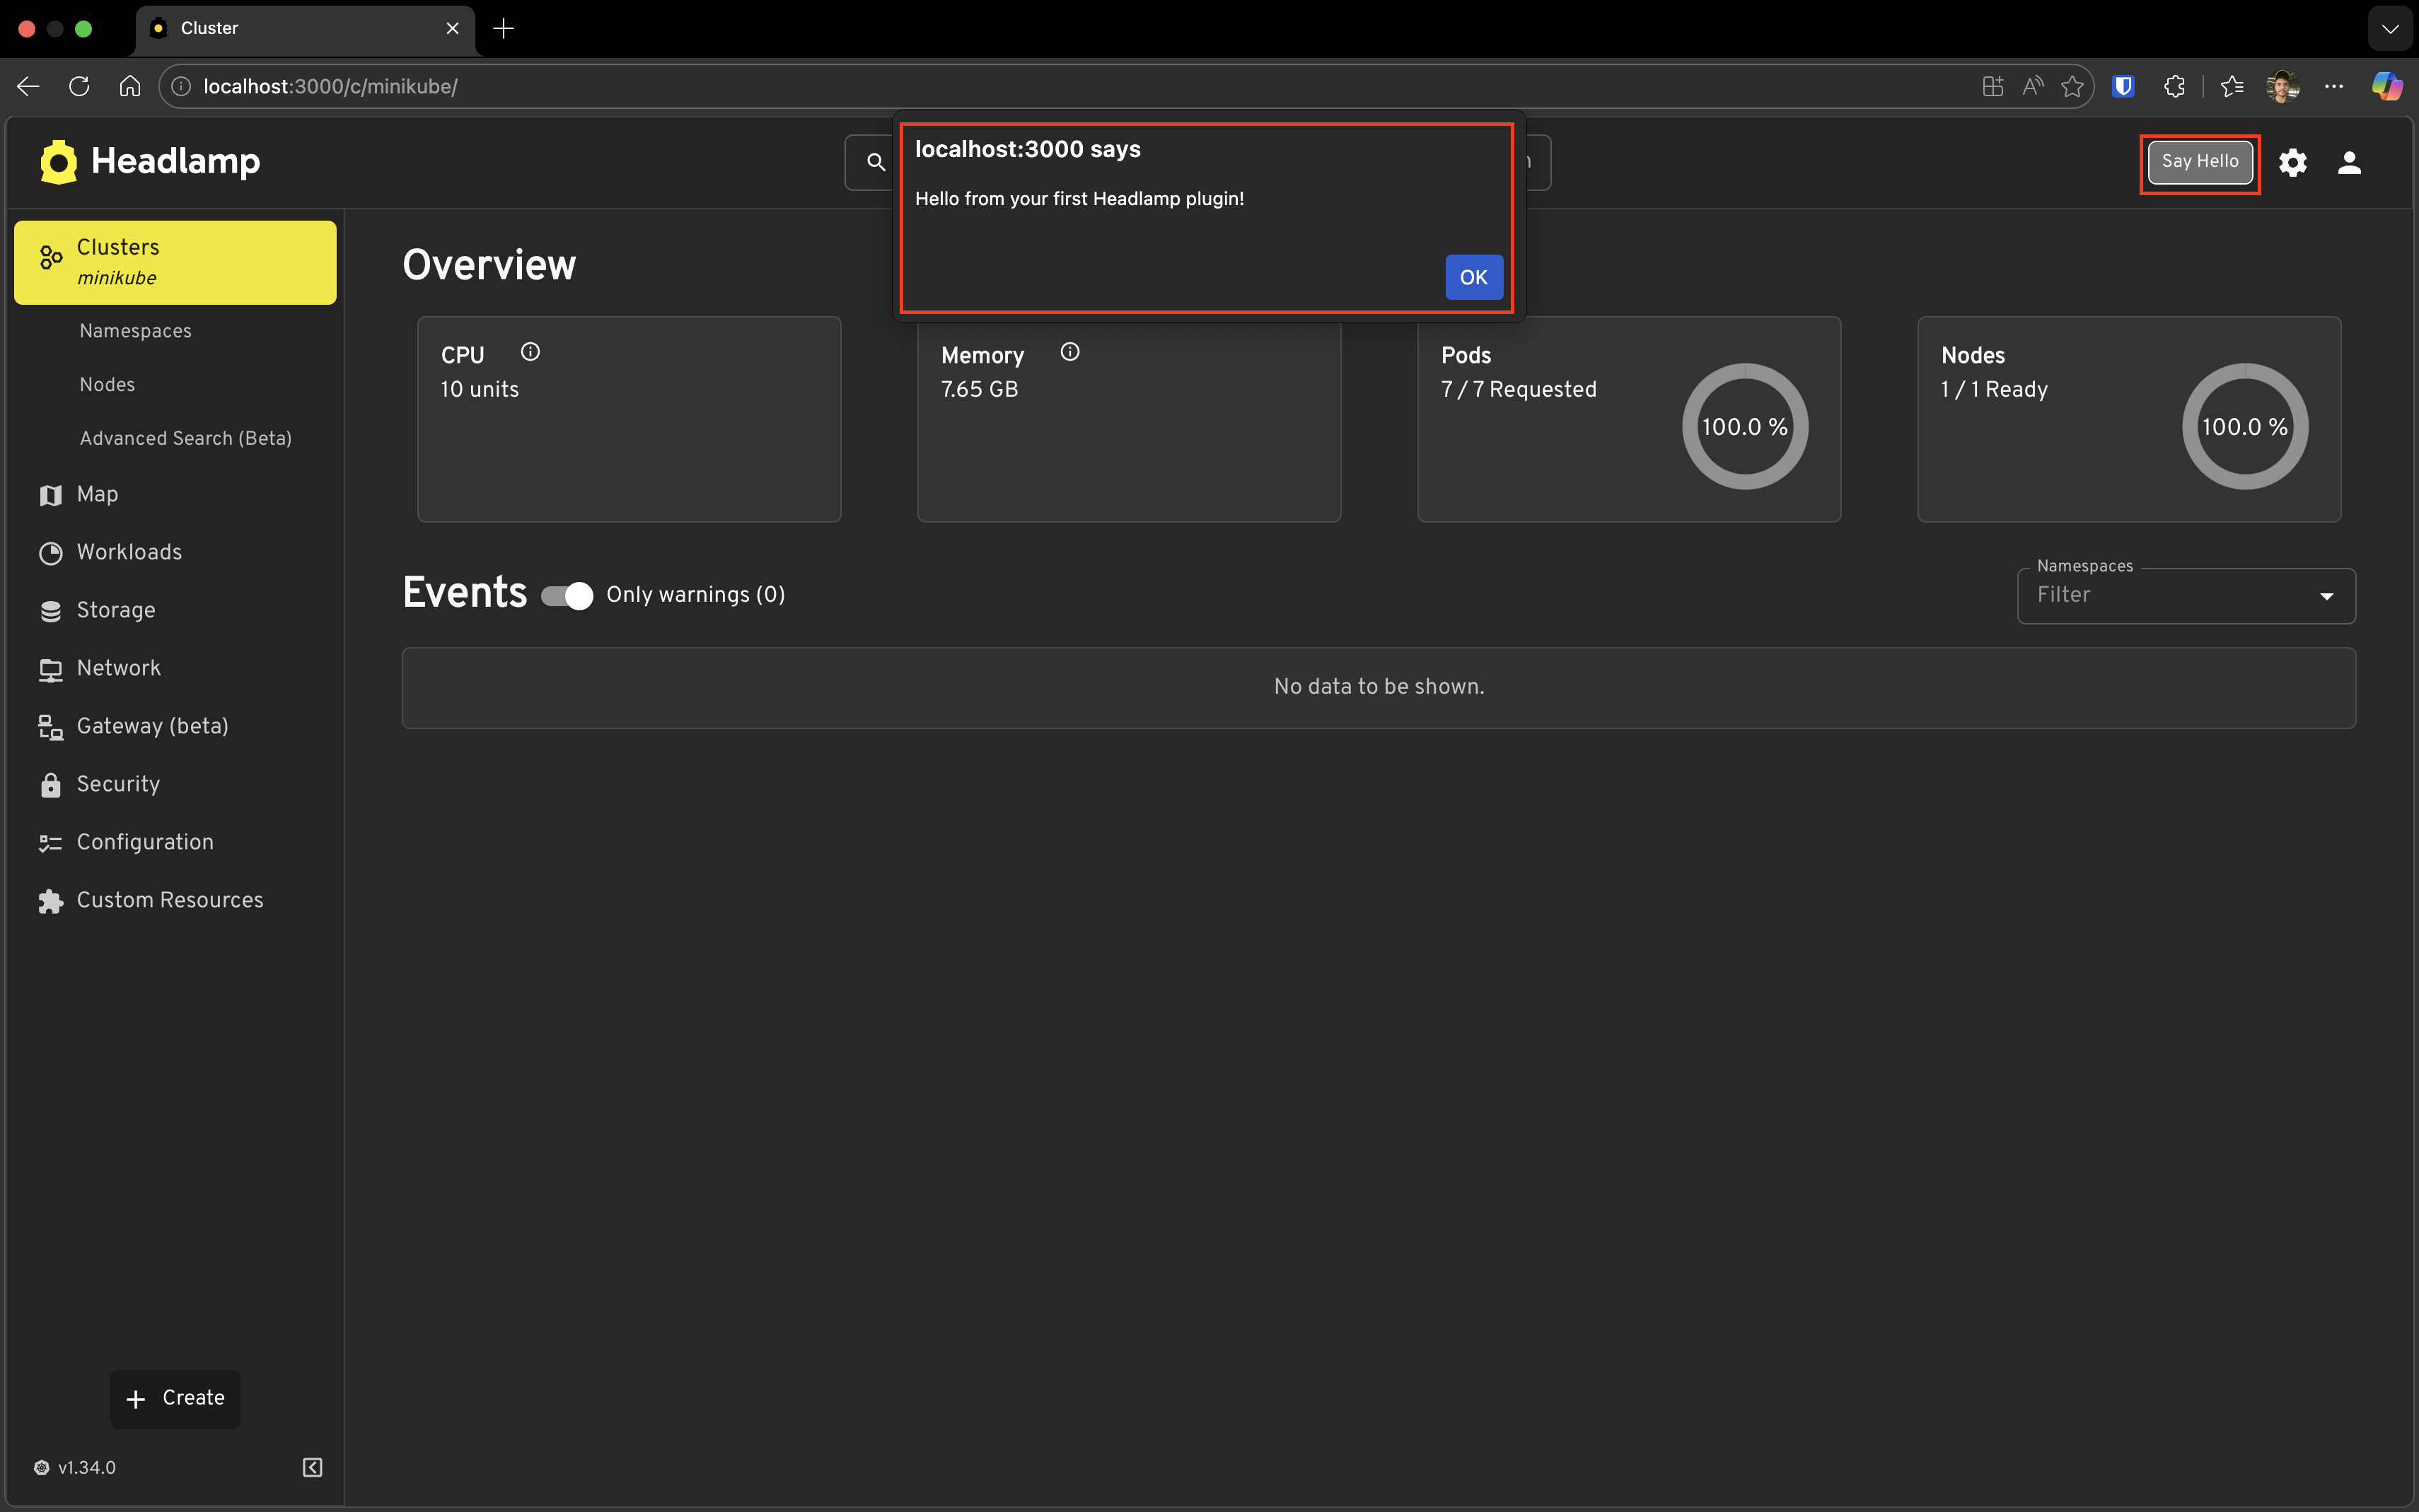
Try Another Change
Let's make it more interesting. Replace the entire content of src/index.tsx:
import { registerAppBarAction } from '@kinvolk/headlamp-plugin/lib';
import { Button } from '@mui/material';

function HelloButton() {
  const handleClick = () => {
    alert('Hello from your first Headlamp plugin!');
  };

  return (
    <Button
      variant="outlined"
      size="small"
      onClick={handleClick}
      sx={{ color: 'inherit', borderColor: 'inherit', mx: 1 }}
    >
      Say Hello
    </Button>
  );
}

registerAppBarAction(<HelloButton />);
Save the file and watch the magic:
- The text changes to a "Say Hello" button
- Click the button to see an alert!
What changed?
- We imported
Buttonfrom Material-UI (already available through Headlamp) - We created a React component
HelloButtonwith click handling - We registered that component instead of a plain
<span>
This is the foundation of all plugin development—creating React components and registering them with Headlamp.
Understanding What Happened
Let's recap what makes your plugin work:
The Register Function
registerAppBarAction(<HelloButton />);
This tells Headlamp: "Hey, I have a component. Please display it in the app bar."
Available Register Functions
registerAppBarAction is just one of many registration functions. Here are some others you'll learn about:
| Function | What it does |
|---|---|
registerAppBarAction | Add items to the top navigation bar |
registerSidebarEntry | Add items to the left sidebar menu |
registerRoute | Create new pages/routes |
registerDetailsViewSection | Add sections to resource detail pages |
registerPluginSettings | Add a settings panel for your plugin |
Each function lets you extend a different part of Headlamp. We'll explore these in upcoming tutorials!
Shared Dependencies
Notice how we imported Button from @mui/material:
import { Button } from '@mui/material';
You didn't need to install Material-UI—Headlamp provides it! These shared dependencies are available to all plugins:
- React — UI framework
- Material-UI (
@mui/material) — Component library - React Router — Navigation
- And more...
This keeps plugins small and ensures consistent styling across Headlamp.
Troubleshooting
Plugin Not Appearing in Headlamp
Check if both are running:
- Headlamp should be running (
npm startin Headlamp folder) - Plugin should be running (
npm startin plugin folder)
Check the plugin terminal for errors:
# In your plugin folder
npm start
Look for any red error messages.
Try restarting both:
- Stop the plugin (
Ctrl+C) - Stop Headlamp (
Ctrl+C) - Start Headlamp first, wait for it to be ready
- Start the plugin
Changes Not Reflecting (Hot Reload Not Working)
Ensure you saved the file — Hot reload only triggers on save.
Check the plugin terminal — You should see "Compiling..." when you save.
Hard refresh the browser:
- Windows/Linux:
Ctrl + Shift + R - macOS:
Cmd + Shift + R
Clear browser cache:
- Open Developer Tools (
F12) - Right-click the refresh button
- Select "Empty Cache and Hard Reload"
Port Conflicts
If you see errors about ports being in use:
# Find what's using port 3000
lsof -i :3000

# Find what's using port 4466
lsof -i :4466
Kill the conflicting processes or use different ports.
Build Errors
If you see TypeScript or build errors:
# Check for TypeScript issues
npm run tsc

# Check for linting issues
npm run lint

# Auto-fix some issues
npm run lint-fix
What's Next
You've just created your first Headlamp plugin! 🎉
This tutorial covered registerAppBarAction—just one small piece of what plugins can do. Headlamp's plugin system offers many more capabilities:
- Tutorial 3: Adding Sidebar Navigation — Create menu items that link to your custom pages
- Working with Kubernetes Data — Fetch and display cluster information
- Customizing Resource Views — Modify how Kubernetes resources are displayed
- Adding Custom Themes — Change colors, fonts, and overall appearance
- Publishing Plugins — Share your creations with the community
We'll cover these in the upcoming tutorials. In the meantime, check out the example plugins in the Headlamp repository for inspiration!
Quick Reference
Plugin Commands
Run these from your plugin directory (hello-headlamp/):
| Task | Command |
|---|---|
| Start development mode | npm start |
| Build for production | npm run build |
| Check code for issues | npm run lint |
| Fix linting issues | npm run lint-fix |
| Format code | npm run format |
| Type check | npm run tsc |
| Run tests | npm run test |
| Package for distribution | npm run package |
Headlamp Commands
Run these from your Headlamp directory:
| Task | Command |
|---|---|
| Start Headlamp (backend + frontend) | npm start |
| Start desktop app | npm run app:start |
Key Files
| File | Purpose |
|---|---|
src/index.tsx | Main plugin entry point |
package.json | Plugin metadata and scripts |
tsconfig.json | TypeScript configuration |